CAD Blocks categories
 3D models
 home furniture
 sanitary ware - bathrooms
 professional equipment
 doors and windows
 people and animals
 plants and trees
 vehicles - transports
 architectural details
 mechanical - electrical
 urban planning - civil works
 safety health construction
 accessible design
 drawing sheet
 signals
 construction machinery
 accessories and objects
 maps and street maps
Title Block for D, E, F, H, J, and K Sizes

size: 34 kb
category: drawing sheets and presentations
description: title block tailored to D, E, F, H, J, and K drawing sizes, compliant with ASME Y14.1 standards. These title blocks cater to large-format sheets, commonly used in engineering and architectural projects.
file extension: .dwg CAD - AutoCAD software
Standardized Title Blocks for Large Format Drawings
Overview of ASME Y14.1 Title Blocks
The ASME Y14.1 standard specifies title blocks for D, E, F, H, J, and K sheet sizes, tailored to large-scale engineering and architectural designs. These title blocks are essential for documenting project details with precision and clarity, ensuring compatibility with industry practices.
Standardized Dimensions for Large Sheets
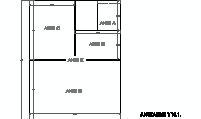
Large-format title blocks for D, E, F, H, J, and K sheets, as defined in ASME Y14.1, have an overall size of 7.62 x 2.50 inches. These blocks are designed to organize critical drawing details systematically, ensuring clarity and consistency in engineering and architectural documents. Below is an explanation of each section and its purpose:
Top Section:This section includes the following fields:
- Names of the designers and date of completion: Used to record the names of the designers and the date the drawing was finalized. Example: "John Doe, June 15, 2024."
- Name and address of the company: Displays the company or organization responsible for the drawing. Example: "Engineering Solutions LLC, 1234 Main Street, Anytown, USA."
- Title of the drawing: Indicates the specific name or title of the project or design. Example: "Structural Layout for Office Building."
Middle Section:This section is reserved for technical and administrative details, including:
- Design approval: The name or signature of the person who approved the design. Example: "Approved by Jane Smith."
- Additional approval: A secondary approval field for further reviews or verification. Example: "Reviewed by Project Manager."
- Size: Indicates the size classification of the drawing sheet, such as D, E, or K. Example: "Sheet Size: E."
- Supply code for manufacturers: Displays relevant manufacturing codes or part numbers. Example: "Code: 5678-ABCD."
- Drawing number: A unique identifier for the drawing for easy reference and retrieval. Example: "Drawing No: 2024-456."
- Revision (Rev): Tracks the current version of the drawing, with the latest revision indicated. Example: "Rev: 02."
Bottom Section:The bottom section is used for additional technical details, such as:
- Scale: Specifies the scale used in the drawing. Example: "Scale: 1:50."
- Sheet number: Identifies the specific sheet in a multi-sheet drawing set. Example: "Sheet: 3 of 10."
This structured layout ensures that all relevant information is easily accessible and uniformly presented, which is essential for technical and collaborative projects in CAD environments.
Title Blocks: Types, Uses, and Standards
Title blocks are an essential element in technical drawings, providing a structured area to display critical project and document information. They are designed to ensure uniformity, clarity, and consistency in engineering, architectural, and manufacturing documentation. Title blocks can be classified into several types based on their orientation, layout, and purpose:
Horizontal and Vertical Title Blocks: Horizontal title blocks are typically used in larger sheets, such as ANSI D and E sizes, where the primary viewing orientation is landscape. Vertical title blocks are more common in smaller sheets, such as ANSI A or B, where portrait orientation is preferred. The choice between horizontal and vertical depends on the industry standard, the type of information to be displayed, and the layout of the drawing itself.
Advantages of Using Title Blocks: Standardized title blocks simplify document organization and communication. They ensure that all critical information, such as project titles, sheet numbers, revision history, and approvals, is consistently placed and easily accessible. This reduces errors and improves collaboration between teams in large projects.
Varieties of Title Blocks: Title blocks can be customized based on industry and project requirements. For instance, manufacturing industries may include additional fields for material specifications or quality control, while architectural firms often prioritize design approvals and zoning information. In CAD environments, title blocks can also include customizable fields linked to attributes, enabling users to populate data dynamically across multiple drawings.
Standards Governing Title Blocks in the U.S.: In the United States, title blocks are regulated by ANSI and ASME standards. The most commonly referenced standard is ASME Y14.1, which specifies sheet sizes and the format of title blocks. ASME Y14.5 provides additional guidelines for dimensioning and tolerancing, ensuring compatibility with technical requirements in engineering documentation.
International Standards: Outside the U.S., ISO standards are commonly used. ISO 7200 specifies the technical product documentation requirements for title blocks, ensuring global compatibility. Other regions, such as Canada, may adopt standards influenced by both ANSI and ISO to maintain consistency across international projects.
Compatibility with CAD Software: Modern CAD programs, such as AutoCAD and Revit, support title blocks through templates and attributes. Title blocks can be pre-designed and reused across projects, allowing teams to maintain consistency. CAD software also supports the use of attribute blocks, which enable users to fill out fields automatically or manually, reducing time spent on repetitive data entry.
CAD Attribute Blocks: Using attribute blocks in CAD software is a powerful feature for managing title blocks. These blocks allow fields such as drawing numbers, revision data, and sheet information to be populated dynamically from project metadata. This ensures accuracy and streamlines the workflow, particularly in projects with multiple sheets or revisions.
Why Use Standardized Title Blocks? Standardization ensures that drawings meet industry and legal requirements. Whether following ANSI, ASME, or ISO standards, the use of standardized title blocks facilitates compliance, improves readability, and enables seamless collaboration across international projects. This is especially crucial in fields like construction, engineering, and manufacturing, where precision and consistency are paramount.
Applications in CAD
In CAD workflows, title blocks for large sheets ensure that critical information is systematically presented. From engineering blueprints to architectural plans, these blocks streamline collaborative efforts by maintaining clarity in technical designs.
Frequently Asked Questions about ASME Y14.1
What is ASME Y14.1? It is the American standard for defining drawing sheet sizes and formats.
What sizes are included? Sizes range from A (8.5 x 11 inches) to K (roll formats).
How does it apply to CAD? Ensures CAD drawings conform to global engineering practices.
Can title blocks be customized? Yes, fields can be adjusted within ASME guidelines.


