CAD Blocks categories
 3D models
 home furniture
 sanitary ware - bathrooms
 professional equipment
 doors and windows
 people and animals
 plants and trees
 vehicles - transports
 architectural details
 mechanical - electrical
 urban planning - civil works
 safety health construction
 accessible design
 drawing sheet
 signals
 construction machinery
 accessories and objects
 maps and street maps
Title Block for A, B, C, and G Sizes

size: 36 kb
category: drawing sheets and presentations
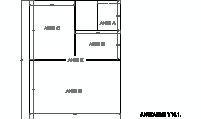
description: standardized title block as per ASME Y14.1 for A, B, C, and G sheet sizes. It showcases key sections such as company details, design approval areas, and a layout for specifying scales, sheet numbers, and revisions.
file extension: .dwg CAD - AutoCAD software
Essential Details for Standardized Drawing Title Blocks
Overview of ASME Y14.1 Title Blocks
The ASME Y14.1 standard specifies the format and layout for title blocks on engineering drawing sheets. These title blocks are an essential part of professional documentation, featuring designated areas for project information such as title, sheet number, approval status, and revisions. This ensures consistent and accurate communication in the fields of engineering and construction.
Standardized Dimensions in Title Blocks
According to ASME Y14.1-2012, title blocks are designed to fit standardized drawing sheet sizes from A to G. For flat sheets, dimensions follow ANSI standards, with A-size sheets measuring 8.5 x 11 inches and G-size sheets adapted for rolls. These dimensions ensure global compatibility and uniformity across CAD drawings.
Key Sections of a Title Block
The title block illustrated in the ASME Y14.1 standard for A, B, C, and G size drawings consists of 11 key sections. Each section is designed to organize specific information, ensuring clarity and consistency in technical drawings. Below is a detailed explanation of each section with dimensions:
1. Names of the designers and date of completion: This field records the names of the team members responsible for the drawing and the completion date. Dimensions: 2.00 x 1.13 inches.
2. Name and address of the company: This section identifies the company or organization responsible for creating the drawing, including its address. Dimensions: 4.25 x 0.51 inches.
3. Title of the drawing: The central field to name the specific project or design. It provides a clear and concise description of the drawing's purpose. Dimensions: 4.25 x 0.62 inches.
4. Design approval: Reserved for the signature or stamp of the person or department that approved the design. Dimensions: 2.00 x 0.31 inches.
5. Additional approval: A secondary section for additional reviews or verifications by other authorized personnel. Dimensions: 2.00 x 0.31 inches.
6. Size: Indicates the size of the drawing sheet (e.g., A, B, C, G), ensuring the document complies with the specified dimensions for standardization. Dimensions: 0.375 x 0.37 inches.
7. Supply code for manufacturers: This field provides specific codes or references used for manufacturing or procurement purposes. Dimensions: 1.00 x 0.37 inches.
8. Drawing number: A unique identifier for the drawing. Dimensions: 2.00 x 0.37 inches.
9. Revision (Rev): Tracks changes made to the drawing. Dimensions: 0.375x 0.37 inches.
10. Scale: Indicates the scale used in the drawing (e.g., 1:10, 1:20). Dimensions: 0.75 x 0.25 inches.
11. Sheet: Specifies the sheet number, particularly in multi-sheet projects. Dimensions: 1.75 x 0.25 inches.
These sections collectively make the title block an essential part of technical drawings, ensuring that critical information is systematically presented and easy to locate.
Applications of ASME Y14.1 in CAD
In the context of CAD, the ASME Y14.1 title block serves as a foundational element in drafting and modeling software. Its predefined sections allow engineers and architects to maintain clarity and compliance when exporting .dwg files for construction or manufacturing. This facilitates seamless collaboration between diverse teams and disciplines.
Frequently Asked Questions about ASME Y14.1
What is ASME Y14.1? It is the American standard for defining drawing sheet sizes and formats, ensuring consistency in engineering documentation.
What drawing sizes does it cover? ASME Y14.1 specifies sizes ranging from A (8.5 x 11 inches) to G (large roll formats). Each size is designed for specific engineering or architectural needs.
How does it apply to CAD? The standard ensures that drawings created in CAD software conform to global engineering practices, particularly when exporting files like .dwg for collaborative projects.
Can title blocks be customized? Yes, organizations can adapt the fields within title blocks to suit their specific needs, as long as they follow the general guidelines outlined in ASME Y14.1.
Why is standardization important? Standardized title blocks and sheet formats simplify collaboration across industries, reduce errors, and ensure that technical drawings are understood universally.


